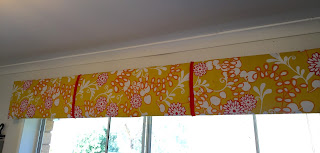
I've had experience making pelmets before. I've covered an existing wooden pelmet with new fabric and I've made a new one using foam board and both turned out well (so well they were still attached to the windows when we sold our house). Edit - the two photos below are professional property photos used to sell our house - all other photos are mine (and you can tell!).
 |
| covered wooden pelmet - Ikea fabric (ps my craft room has never been this neat before or since this photo) |
 |
| the foam board pelmet also covered with Ikea fabric |
The idea of using cardboard boxes, rather than wood or foam board really appealed to me because:
- I have plenty on hand after moving house recently
- I love to use recycled materials in my crafting when ever possible
- no $$ outlay for foam board - winning!
Now a couple of things to be aware of about me before we start; I'm an imperfect crafter/maker, I mostly eyeball measurements (rather than actually measuring), I tend to rush ahead and then have to go back, undo and make alterations and I can be extremely impatient which often leads to lots of "it'll do" moments.
I do have fun though and most things I attempt turn out ok in the end but if you are a perfectionist you may want to look away now.
What I used (all materials came from my stash)
- cardboard boxes - enough to fit the length and depth of window
- wadding
- fabric to cover the cardboard/wadding
- fabric trim
- jewellery wire
- cutting knife & scissors
- packing tape
- staple gun
- ruler & measuring tape
- iron
I started by folding and cutting up two boxes to fit the length of my window. I used packing tape to join the two boxes together and made it stronger by folding up all the flaps, rather than cutting them off.
Next I folded my wadding in half (I only had thin wadding on hand) and placed it on top of the cardboard. Again I used packing tape to keep it in place.
Then I lay my furnishing fabric over the wadding, folded the ends over and stapled around the edges. The fabric wasn't long enough so I had to join two pieces together. For a more polished finish I thought about sewing the two fabric pieces together, but I knew I was going to hide the join anyway so after ironing I simply butted the fabric ends together over the base and stapled in place.
Then I went hunting for trim to hide the join. I originally thought I'd use ribbon but looking through my stash I found some actual trim that matched back to the fabric. I then simply stapled the trim into place. I did some measuring and added another piece of trim further along the pelmet to create balance.
And presto we're done, right? Wrong! Now comes the adjustments because I'm not a crafty forward planner.
I had Mr Bear help me hold it up against the window and discovered: 1. the sides where too long, making the pelmet sit out too far from the window 2. it was going to need reinforcing in the middle otherwise there'd be sagging and 3. the window sides where too thin to attach the pelmet to (as per Diane's instructions). Dilemmas.
So first I simply folded the side pannels in half (ah the beauty of cardboard)- this meant no cutting and re positioning fabric and it worked to give the sides more strength. Then I cut a hole into each end and pushed the curtain rod through. I solved the sagging problem by inserting jewellery wire through the middle of the pelmet and twisting it around the curtain rod to keep it all in place. (This step was the most painful as I had to take out staples and get my hands in under the fabric and push the wire through two small holes I made in the cardboard. Would have been really easy to do at the start before attaching the fabric but after a (tiny) bit of swearing it worked.)
Thoughts:
- cardboard is really durable which helped when I had to make adjustments. Also it's cost neutral, just recycle old boxes
- I'd make again with cardboard but on a smaller window - not having to worry about joining fabric together and sagging in the middle will make everything simpler. I think foam board will be better for large windows.
- I recommend using furnishing fabric for best results - I used thin cotton fabric on the back and it tore easily
- fabric tape would have been stronger than the staples (I think) but it would have made it much harder to add the wire - as the staples were easy to remove
- ribbon can be substituted for fabric trim
- even if you didn't have everything on hand it'd be cost effective to make as you'd only need to purchase some wadding and no more than one meter of fabric (and maybe some fabric tape)
So there you have it - a beautiful new Window treatment inspired by pinterest. Next up, curtains.
 |
| night time |
 |
| daytime |


No comments:
Post a Comment